In this video we will show how to create a LEGO Mosaic Portrait from a photo. There will be tips and suggestions on how to do this, along with a full time-lapse so you can see everything start to finish.
The topics that are covered in the video are:
– software used to create LEGO Mosaics from a photograph
– how to figure out parts required and where to order them from
– base plate considerations to build your mosaic on
– suggestions for the optimum photo, tweaks and considerations so you get the best result
– an approach to the actual tile application.
A selection of mosaic makers can be found on my website at:
https://www.mattelder.com/lego-videos/lego-mosaic-image-makers
Affiliate link to Fun Haven base plates used in this video
#mosiac #legomosaic #LEGO #legoafol #legomoc #photobricks #instalego #legoart #moc #legomocs #legobricks #afol #legoman #legolife #mocs #legobuilder #legoideas #legocreations #legoinstragram #legofan #legocommunity #afolclub #legophotography #legofun #legomania
Transcript from the show:
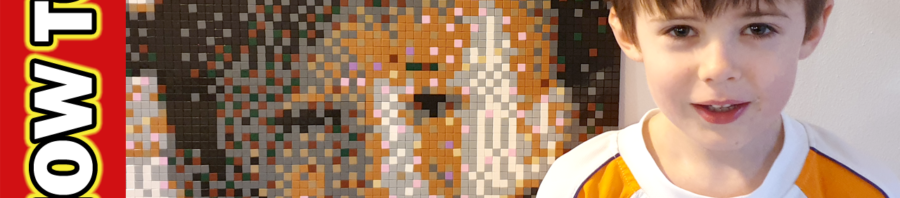
G’day Everyone, Matt Elder of Mattelder.com here and today we are going to cover off how to create a LEGO mosaic similar to this one. This is going to be the first video of a 2 or 3 part series. In this video we’ll give an overview of the whole process and in later videos we’ll go into a lot more in depth on certain aspects.
We’ll start of first by talking about mosaic maker websites and downloads, to create a mosaic from a photo.
Please visit mattelder.com and subscribe so you can always be kept in the loop with new videos and exclusive content regardless of any YouTube’s algorithm changes
Mosaic Maker Links
To find a list of links to mosaic makers you can go to my website mattelder.com and then you can scroll down to the November 2019 archive. Give that a click and then if you go down to the one on the 14th of November, Lego mosaic image makers.
There is the one which I’ve done and then below here is the list of different mosaic makers out there and as i find other ones which work, I add them into the list. So you can always come back here and check it.
Pictobrick.de
The one which i used to create this image was the pictobrick.de So if you click on that, pictobrick here. The Einstein one.
There is a download which you can download to your operating system which I quite like so once you’ve downloaded then, you’ve got it forever. Whereas some of the other ones, they’re hosted online, so if they ever go down then you won’t have access to them again.
And in the tutorial there, it just runs you through a few different options on how to use it in the mosaic maker.
Instructions
Once I’d uploaded my picture, adjust to the size selected the colors, I was then able to output these documents. Which tell you a whole bunch of information. So this is the actual image to work off in your image and then if you go under bill of material, it will then tell me here all the different colors I selected, 1 by 1 tiles.
And it’ll tell me all the different colors and how many I need of each then under building instruction. It will tell you row by row, column by column, what each piece should be so you can only use the row by row and column or you can just go back to the image that was created.
Getting Bricks
From this, we then ordered the pieces required from the secondary marketplace bricklink.com , and this is what came back.
Okay I can go to a package it’s got most of the bits which we need. You open it it’s quite heavy for what is 2 kilograms. no the pieces so I’m looking at about almost 9,000. Lime, white, Light Bluish Grey, Dark Tan, Dark Green, Medium Dark Flesh, Reddish Brown, Dark Bluish Grey, Tan, Black.
Base Plates
Normal base plates you get the Lego ones these are 32 by 32 studs which is about 25 by 25 centimeters or once that 10 inches by 10 inches usually get these. But what we want for this one is one a red color and they generally only come in the greens, blues, <white> or large, the grays which near which
reason for that is if you have any little gaps and things showing through, you’ll see the greens or the blues or whatever it is. From art, whenever you do things underneath you generally, for flesh and stuff like that, always start with something room which is like a red. Because if you use a blue or a green, if that shows through or if somebody’s got a slight blue or a green tint to them, they look and feel sick.
So I couldn’t get them in the Lego ones. I managed to get one of these ones here which will give a try. So a fun Haven one could be interesting. The other thing at universities and petrol normal Lego one’s actually gonna be the thickness to them Lego ones
Differences and Clutch Power
What’s that?! Maybe one or two mills. These, a little more like three or four yeah. You can nice and the difference is on the back. This is just a standard tool one wears this it’s got some regular legged fits stick pieces into it. Knowing of these you can’t build it up and put anything underneath it.
So if we just take the normal base, put a couple of these two by ones by fives on each corner and they can all go into the under side and that’s pretty rigid. You can start stacking them.
Usually I stay away from anything which is non LEGO as found the quality or the clutch powe,r which is how they stick, be quite poor so things come off. These ones, just want to try see what they like want to do the demo test on them. They seem to stick pretty well actually.
So I’ll see how they go. I’m going do two of these at once. Actually I’m do it there’s a 64 by 64, so two there – they’re probably going off camera. You know you got a square and then for the second one another for these.
Time-lapse
And now onto the timelapse. We’d actually taken that final image from the mosaic maker, and printed quarters of the image on standard A4, 8×11 ish inch paper. Thus each red base plate was a quarter and just made doing the mosaic easier and more manageable. Every couple of rows that we go along, we’ll mark off on the printer out. Just makes it easier to keep track of where you are up to.
Colour Considerations
The thing with LEGO is that not all pieces are available in all colours. Thus some of the programs that generate the mosaics aren’t smart enough to work out if that colour is available in that brick, or tile or plate or whatever it is you are using.
Other times it might be available in that colour, but really expensive. Where as if you just moved to another similar colour, it is more readily available and far cheaper / cost effective. So it might be suggested to use a Maersk Blue, where as a Medium Azure would be around an 1/8th the price.
Check out our other video where we’ve developed LEGO brick and tile colour wheels / guides. These go into this is a lot more detail and really handy for anyone doing My Own Creations, or MOCs.
We’ve used flat 1×1 tiles but you could have just as easily used 1×1 plates, 1×1 bricks or whatever sizes will fit the colour lengths.
Base Plates
Around this video we’ll also provide an affiliate link to those Fun Haven base plates as they seemed really reasonable. Having the ability to stick bricks on the back makes it easier to join them together with other plates and mount them.
We’ve also discovered that 64×64 studs is just slightly larger than 50cm x 50cm, which seems to be the last standard frame and memory box sizes. So once you go beyond a standard 48×48 stud base plate, mounting and framing become more challenging considerations.
Photo Considerations
For the actual portrait, for best results you want something that has good contrast. Basically this means a photo taken in daylight where there is some shadow on the face. Using a flash will be the worse kind of photo as it flattens the face.
Once you’ve taken a photo, which you’ve probably done on a phone, most have got away to increase the contrast or play with a few filters to make the photo better. It is definitely worth doing this as you will be spending some time on the mosaic part. Thus you want the best possible photo you can get.
Head Size
Try to make the head as big as possible in the mosaic. This just gives the best chance for the eye, nose and mouth shapes to be distinguishable, and characteristic.
Even at the large size of 64 x 64 studs that we’ve gone for here, it still isn’t a lot of detail you are playing around with (even though it is still 4096 1×1 tiles). We did spend a bit of time up front selecting the best image, and tweaking the brightness and contrast. If we couldn’t get something that would work, we’d try with another photo.
Time Considerations
For this one, by the time you select a photo, make adjustments, source pieces and sit down and apply 4096 1×1 tiles, you don’t have much change out of 15 to 20 hours. I might be bias but think the result came out pretty well. The bulk of it is grey tones, with pops of colour just to break up the monochrome look and give a little bit of bounce to the image.
Tiling Approach
The approach to applying tiles would vary but generally start with a row and column and work out hole length. It just became easier to judge tiles relative to one another and prevented too many mistakes. Then might try to block out large patterns of single colours. Which then became easier to place other colours.
As going along, found you could use the edge of a brick separator, or the edge of a plate to align the square tiles. When they don’t sit in straight lines, a slight zig-zag pattern can develop, which might drive anyone with OCD crazy.
This was one of a pair of mosaics we did at the same time, so in the end, dealing with over 8000 1×1 tiles. They were done as gifts and well received. They can be impressionistic like in that when you stand from a far, they appear as a photo. When you get up close however, they dissolve into the square geometric pattern.
All Coming Together…
And here is how the 4 quarters come together…. And here is how they come apart.
If you’d like to get your own custom portrait or pet mosaic, for yourself or as a gift, drop me a line at matt@mattelder.com If you have any questions or comments, let me know in the comments and may try to answer in subsequent follow up part videos. If you enjoyed this video, smash that like button or be awesome and subscribe.
Here are some other videos you might like. Until next time when we talk about all things LEGO.


